Bricks have been used for building strong structures since the beginning of time. In fact, over 6,000 years ago, sun-baked clay bricks were used for building.
Bricks are strong, fire-resistant, and they do not emit any volatile gasses like many other building materials that have been used in the past or are still used today.
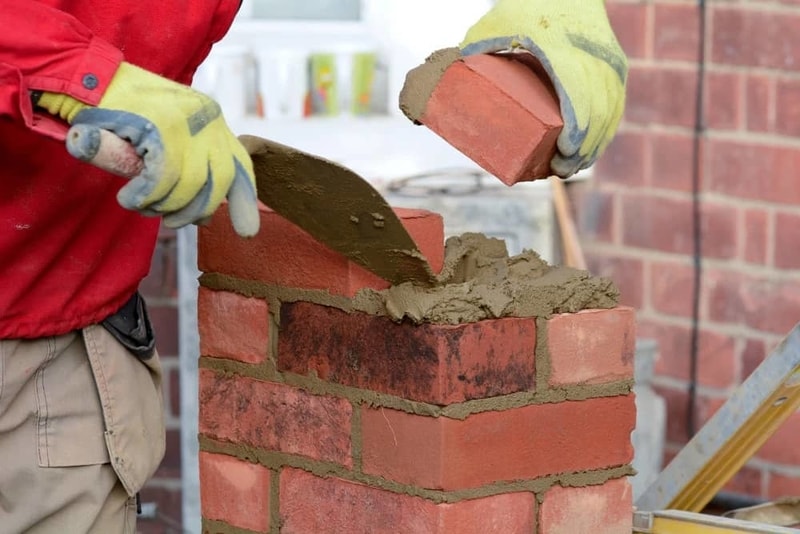
There is a simple 3 step process, spread the mortar, create a trench in the mortar, stick the brick to the mortar! To lay bricks as a beginner you need the right tools, a plan and a little bit of know-how. A trowel, mortar mix, some bricks and your willingness to learn, and you’re well on your way.
How to lay bricks is something that is usually left up to the bricklayers. But it is possible for an amateur to do some minor work on their own with the right tools and instructions. Keep reading for a beginner’s guide on how to lay bricks.
How do you mix mortar?
Mortar mix is typically a mix of fine sand and masonry cement. In order to create mortar, you will combine that mix with water (add slowly), and sometimes hydrated lime, which is also known as a plasticiser.
Adding a plasticiser to the mix will make it easier to trowel. It also creates a better adhesive for bonding the bricks together. You can buy a mix that has cement and sand already or mix the sand and cement together on your own.
Mortar is what you’ll be using to bond the bricks together. It’s what seals cracks and strengthens the bricks as a whole so that weight is distributed evenly and the structure gains its strength.
How much water do you add to mortar mix?
How much water you add will depend on your mix. But to play it safe, you can start by adding bits of water at a time until you create a strong mix that isn’t too watery.
Here are a few tips and tricks to remember when mixing your mortar:
- If your mortar begins to dry, don’t add more water, make a new mix
- Keep your mortar as close to your work area as possible
- Make enough for an hour of work, no more
- Have a ready supply of bricks before you mix
- Wear gloves when mixing as the mortar could irritate or burn your skin
Mortar will dry out after about an hour and lose it’s efficiency. That’s why we suggest mixing only what you can use for about an hour at a time. Now that we’ve talked about the mortar let’s take a look at what tools you should have!
What tools do you need for bricklaying?
DIY brickwork is an exciting adventure! And the more you do it, the more fun you’ll have as you perfect the craft. But laying brick isn’t fun for anyone if you don’t have the right tools to start. Here are all the tools and materials you’ll need for mixing your own mortar and laying brick.
- Mortar mix
- Brick chisel
- Brush
- Hammer
- Engineer’s chalk
- Brick trowel
- Gloves
- Two line blocks
- Spirit Level
- Builder’s line
Now that we’ve covered tools needed and mixing your mortar let’s get started on how to lay bricks!
How do you lay bricks?
Are you wondering what the builder’s line and two line blocks are for? One of the best bricklaying tips we can provide is to make sure your bricks are laid in an even line with the help of a mason’s line.
Affix your line blocks to either end of each row of bricks that you lay. With the string pulled tight between the blocks, the top of each brick in a given row should touch the line.
Make sure that your vertical lines are staggered when you’re laying your bricks. This will ensure that your wall or structure is as strong as it can be.
If your bricks don’t have holes but have indentations instead, make sure these indentations (also known as frogs) are all facing up.
How is mortar applied?
Make sure you place mortar (also known as mud) along the foundation before you lay your first row. When you lay your first row, make sure to apply mortar at each brick end so that every seam, both vertical and horizontal, is filled with mortar.
After each row of bricks, use your line blocks and spirit level to make sure the bricks are level. Then add another layer of mortar to the top of that row of bricks and start adding another row. Just make sure that your bricks are staggered so that seams aren’t on top of one another.
You’ll have some awkward end spots that require smaller pieces of brick. You can cut those pieces as you work to fill in those spots.
5. How do you cut bricks by hand?
In ordered to achieve staggered vertical joints, you will inevitably need to cut some bricks. The most important thing to remember when doing so is to wear safety goggles.
Using your chalk, mark on your brick where you’d like to cut for size. Keep in mind the space you’ll also need for the mortar.
Place the brick you want to cut on solid ground or surface. Align your chisel with the mark on the brick and then give it a sold blow with your lump hammer. If there are any rough edges, you can use your chisel and hammer to even it out.
Once your brick is cut, go ahead and secure it using mortar, the same way that you placed the other bricks.
How to Lay Bricks Is an Amazing Trade
Knowing how to lay bricks isn’t rocket science, but it a beautiful trade that takes practice to make it perfect.
Don’t fret if when you’re laying your bricks, you notice imperfections. You will get better with each batch of mortar and with each row. And once your structure is complete, you won’t notice those tiny imperfections.
Bricks are strong, classic, and timeless. They’re an excellent source for building many different structures. So be bold and get started on your brick-building adventure today! And feel free to contact us with any questions you may have!