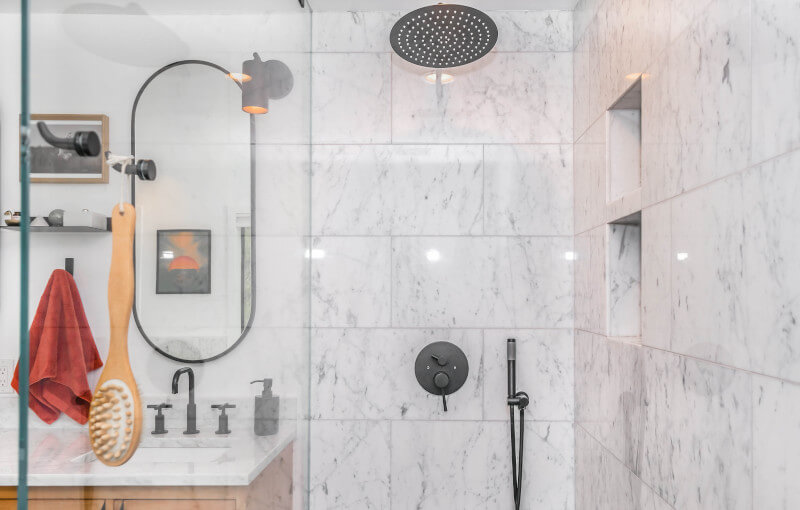
How to tile a shower
Does your bathroom look boring and uninteresting? It’s time to give it a new look! What better way to switch up the aesthetic of your bathroom than by changing the tiles in your shower? There’s an endless list of possibilities as to what you can do with the design.
The recommended order to tile a shower is to begin with the walls and make your way to the floor. This is considered a more efficient method of tiling. You should make sure to measure the shower area, lay the tiles out in their design, level and waterproof the floor and walls before you begin tiling.
Make your bathroom bright and sunny or dark and dramatic – the sky’s the limit. It’s definitely a fun DIY renovation project. Just read our guide below on tiling a shower, and remember to have quality tools with you. Excited to give your bathroom a facelift? Let’s get started.
When tiling a shower where do you start?
It is important to ensure that you have prepared the surface you want to tile before you begin tiling. If you are tiling a new shower, your base wall should be ready for you to apply primer and waterproofing. This happens before tiling because it acts as a protective layer in case water slips through cracks or spaces.
If you are renovating a house, make sure to take out nails that stick out from the walls and sand back the areas before applying any waterproofing.
You should also check that the floor and wall is level because this will help with the tiling process. You can do this by using a spirit level.
Make sure you have the right personal protective equipment. Wearing a face mask is a must when you’re doing this project. Our KN95 mask can filter out more than 95% of harmful particles in the air and prevent dust from getting breathed in. Wear safety glasses as well to protect your eyes. We recommend getting one that is lightweight and comfortable to wear.
How do you plan a tile layout for showers?
Before you can start tiling your shower, you need to plan your tile layout.
Begin planning your tile layout and pattern by measuring the wall area of your shower. You can get the wall area by multiplying the width of the wall by its length. Add each wall area, then add a buffer of 10% just to be sure that you have enough tiles. Now that you have the total wall area of your shower, you can proceed with picking the tile size and design!
What do you put behind tiles in a shower?
While ceramic and porcelain tiles look waterproof, water can actually seep through them and through the tile grout. Waterproofing is an important step to do before you proceed with tiling, as this protects the shower area from water damage and prevents mould growth. It’s important to install a waterproof layer as close to the tile as possible for this method to be effective.
What order do you tile a shower?
Tiling shower walls before tiling the floor is more popular among DIY home renovators. Spills and stains are inevitable while tiling, which is why tiling the wall before the shower floor makes for easier cleanup. Compare this to tiling the floor first before moving on to the walls – you’ll be cleaning up twice over during the whole process.
There are other reasons why many tilers will argue for tiling the shower walls first. When you tile the walls first, you won’t have to risk damaging the floor because the tiles haven’t been installed yet. There is also a shorter waiting time when you start with tiling the walls. You won’t have to wait for the wall tiles to dry completely before you can proceed with tiling the floor.
You shouldn’t have a problem tiling your shower wall first if your floor is level. However, there are times when the floor is uneven, and you may need to cut your wall and floor tiles for them to fit perfectly. We recommend using a high-quality diamond blade for this task. Read about the different diamond blades and their features to know which one is most suitable for your shower tiles.
Do you start tiling from the top or bottom?
Starting in the middle is advisable when you’re tiling horizontally. For a horizontal tile layout, tiling in the middle before moving on to the edges ensures that you end up with a symmetrical look.
But, what if you’re tiling vertically, should you start at the top or bottom? For a vertical tile layout, starting at the top then moving to the bottom is recommended. You’ll have a whole tile at the top, which is more aesthetically pleasing, instead of a cut one.

How do you layout staggered tile?
A staggered tile pattern adds elegance and interest to any shower area. It may look simple enough, but there are some things to take into consideration. Begin by laying down some tiles on the surface to estimate how many tiles you’ll be needing. Because the tiles are staggered, you will also need to have some of the edges cut to fit the shower walls or floor.
The next step is to determine how you’ll want the tiles to be staggered. Many rectangular tiles look best when staggered at half-length. Use a measuring tape and a reliable marker for this, such as an engineer’s chalk pencil or French chalk. When you have marked the tiles, start laying down the first row, then follow it up by laying the second row above the first row, and so on and so forth.
What do you install first shower floor or walls?
Grouting the shower floor before tiling the walls can be inefficient and time-consuming. Grout is a tricky substance to handle – it needs to be completely dried before it can be disturbed. Tiles with a wet grout application aren’t sealed yet and may still be agitated. The better option would be to finish tiling the walls before proceeding with grouting the shower floor.
Following this sequence also ensures that the floor grout doesn’t get stained or destroyed when the walls are being tiled. Once the grout is stained, it’s hard to make it come off. Keeping your floor and wall grout clean is key to having a sparkling shower area. Even if your tiles are new, dirty grout can really bring the whole look down.
How often should shower tile be sealed?
The last step to having a beautifully-tiled shower is keeping it clean. When you’re done tiling the whole area, make sure to wipe off excess grout with a wet sponge. Remove the haze with an acid-based grout cleaner. You may need several applications of the grout cleaner before the tiles start to sparkle.
Apply a grout sealer to the grout and a silicone sealant on the edges. Once dried, your new shower area is ready for use! Keep your bathroom dry and tidy everyday, and have your bathroom deep cleaned regularly. When your grout and tiles are well-maintained, your bathroom will stay looking good as new for a long time.
Paragon Tools are here to help with your home renovations! If you’re wanting to tile your fireplace, make sure you learn about what can be used and where. Maybe you’re wondering how you can remove your concrete driveway, or if you need a mask when cutting concrete.